As an Amazon Associate, I earn from qualifying purchases. Privacy Policy / Terms
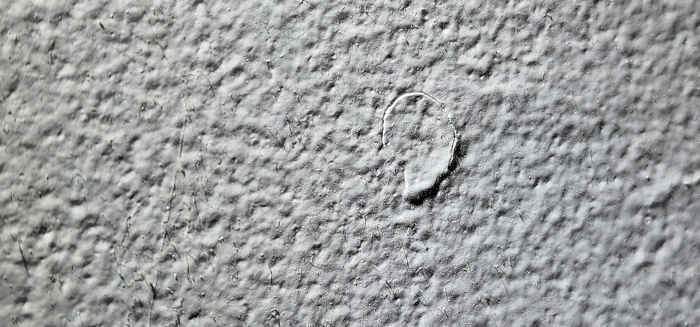
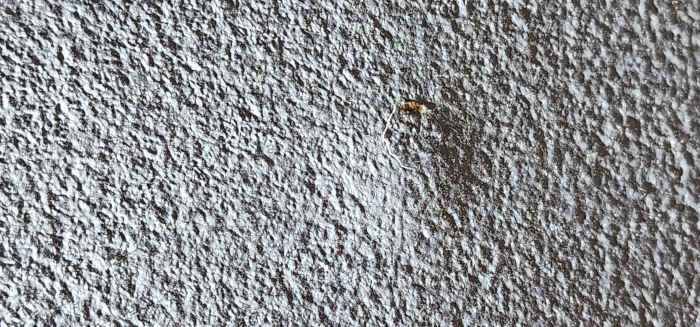
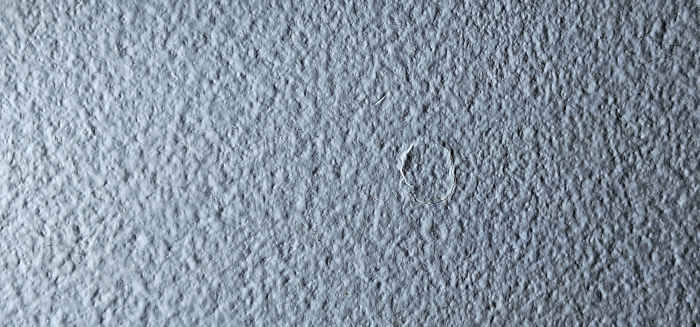
Nail pops in walls can be a common sight in many homes. They appear as small, circular protrusions or depressions on your wall or ceiling.
But what causes these nail pops? And are they a cause for concern?
This article will delve into the world of nail pops. We’ll explore what they are, why they occur, and whether they pose any danger.
We’ll also provide a comprehensive guide on how to fix nail pops. Whether you’re a DIY enthusiast or a homeowner seeking to understand this issue, this guide is for you.
By the end, you’ll be well-equipped to tackle any nail pops that appear in your home. Let’s dive in and demystify nail pops in walls.
What Are Nail Pops?
Nail pops are small bumps or depressions that appear on walls or ceilings. They occur when the nails or screws used to secure drywall shift or become loose.
The phenomenon is quite common in many homes, both old and new. Nail pops usually surface as small circular marks, easily visible upon inspection.
Although often found in new constructions, nail pops can also occur in older buildings. This happens due to natural building movements over time.
Nail pops are generally harmless on their own. However, they can impact the aesthetic appeal of your interiors if left unattended.
In some cases, multiple nail pops in a row might indicate a more significant problem. Structural issues, for instance, might warrant further investigation by professionals.
The good news is that fixing nail pops is straightforward with the right tools and approach. By understanding what nail pops are, you can take appropriate measures to address them effectively.
Common Causes of Nail Pops
Nail pops can have various causes, often intertwined. Understanding these reasons helps in effectively addressing and preventing them.
One frequent cause is the natural settling of a building over time. Houses are prone to slight shifts due to foundational movements.
Changes in temperature and humidity levels also play a significant role. These environmental factors cause materials to expand or contract.
Improper drywall installation is another culprit behind nail pops. Ensuring the correct installation of drywall can reduce their occurrence.
Moisture fluctuations can lead drywall to swell or shrink. This process dislodges nails, resulting in pops on surfaces.
Here’s a brief list of common nail pop causes:
- Natural house settling
- Temperature and humidity changes
- Improper drywall installation
- Moisture fluctuations
- Incorrect nail or screw placement
Correcting these factors can significantly lessen nail pops. Consistent checks and repairs further help mitigate these issues.
It’s vital to address each cause individually. This targeted approach ensures effective solutions for the long term.
Understanding these causes also prepares homeowners for potential issues. A well-informed homeowner can better maintain their home’s aesthetic and structural integrity.
Natural House Settling and Temperature Changes
As houses settle over time, minute shifts can occur. These shifts, while natural, often result in nail pops.
Temperature fluctuations are also significant contributors to this problem. Hot and cold cycles cause materials to expand and contract.
These movements place stress on nails and screws. As a result, they can loosen from their positions within the drywall.
When these changes happen, the nails begin to push through. Understanding this dynamic helps in anticipating nail pop occurrences.
Improper Drywall Installation
Inadequate drywall installation is a notable factor. Incorrect alignment or insufficient fastening leads to future problems.
The use of unsuitable nails can also cause pops. Proper tools and techniques ensure greater stability.
Ensuring nails are driven into the studs is crucial. Without this support, nails are more likely to eventually pop out.
Observing installation guidelines helps to prevent these issues. Following best practices ensures a long-lasting and even drywall surface.
Moisture and Humidity Fluctuations
Moisture can wreak havoc on drywall stability. Increases in humidity levels cause drywall to swell.
Similarly, when humidity drops, drywall contracts. This back-and-forth movement causes nails to pull away from the wall.
In regions with extreme humidity changes, nail pops are more common. Taking measures to control indoor humidity can help.
Sealing walls and ensuring good ventilation are preventative strategies. Managing moisture levels contributes to less nail pop occurrence.
Are Nail Pops Dangerous?
Nail pops can appear concerning when suddenly visible on a pristine wall. However, most nail pops are harmless and purely aesthetic issues.
These occurrences do not generally affect the structural integrity of the wall. They are primarily cosmetic blemishes that may require attention for appearance.
In some cases, widespread nail pops might hint at underlying issues. These could involve improper construction or significant shifts in a home’s foundation.
It is critical to assess if the nail pops are isolated incidents or signs of a larger issue. Regular inspection of nail pop clusters can prevent potential problems.
If you find nail pops near ceilings, checking for water damage is wise. Persistent moisture can weaken the drywall, leading to further complications.
When in doubt, consulting a professional for an assessment can provide peace of mind. It is important to address any structural concerns promptly to maintain home safety.
How to Identify and Assess Nail Pops
Identifying nail pops in your walls or ceilings is relatively straightforward. Look for small, circular bulges or visible nails in the drywall surface.
These imperfections can disrupt the smooth, clean appearance of walls and ceilings. Paint may crack or chip around these areas, making them more prominent.
To assess the severity of nail pops, consider their number and distribution. A few isolated nail pops typically do not indicate major problems.
If you notice multiple nail pops in a row or clusters, investigate further. Such patterns can suggest consistent issues, like structural shifts or poor drywall installation.
Consider any recent changes or events that may have caused sudden pops. Factors like recent renovations, seasonal changes, or increased humidity can influence these occurrences.
Always inspect the surrounding area for additional signs of trouble. Cracks, gaps, or other wall imperfections accompanying nail pops may warrant professional evaluation.
Step-by-Step Guide to Fixing Nail Pops
Fixing nail pops is a manageable task with patience and the right tools. Follow these steps for effective repair. It’s important to ensure a neat finish.
Preparing the Area
First, gather your tools and materials. You’ll need a hammer, drywall screws, a putty knife, drywall compound, sandpaper, and paint.
Protect the area by laying down a drop cloth and wearing safety goggles. Clean any dust or debris from the surface around the nail pop.
Repairing the Nail or Screw Pop
Gently tap the nail deeper into the wall using a hammer. Alternatively, remove it entirely if it feels loose.
Next, secure the drywall by inserting a drywall screw a few inches above the old nail. This helps anchor the panel securely to the stud.
Ensure the screw head is slightly below the drywall surface. Be cautious not to tear the paper layer.
If dealing with a screw pop, tighten the existing screw back into place. Add another screw nearby for extra support.
Applying Drywall Compound
With a putty knife, spread a thin layer of drywall compound over the nail pop area. Ensure an even application to cover the indentation completely.
Allow the compound to dry thoroughly. This might take several hours, depending on humidity and product instructions.
Sanding and Painting
Once the compound is dry, lightly sand the area until smooth. Use fine-grit sandpaper for a seamless finish.
Wipe away any dust with a clean cloth. This step ensures good adhesion for the paint.
Prime the patched area to prevent paint absorption differences. This ensures a consistent color finish.
Finally, paint over the repair, blending with the existing wall or ceiling. Take care to feather the edges for uniformity.
Preventing Future Nail Pops
Preventing nail pops requires attention to detail and a few proactive measures. Focus on quality work during installation and maintenance.
Start with proper drywall installation. Ensure sheets are aligned correctly and fastened securely to the wall studs. Use screws rather than nails for added stability.
Consider environmental factors that can contribute to nail pops. Maintain consistent indoor humidity levels to avoid drywall expansion and contraction.
When building or renovating, allow materials to acclimate to the environment before installation. This step minimizes future movement and stress.
Check for structural issues regularly. Settling or movement in the foundation can lead to recurring nail pops over time.
Here are key steps to prevent nail pops:
- Use drywall screws instead of nails.
- Keep consistent humidity levels.
- Acclimate materials pre-installation.
- Inspect for structural movement.
- Choose quality materials and workmanship.
Practice these tips diligently to maintain pristine walls. Prevention is often easier than repair. Taking these steps can save time and effort in the long run.
When to Call a Professional
Certain situations with nail pops require expert intervention. Understanding when to call in a professional can save both time and stress.
If nail pops are widespread, covering extensive areas in your home, professional assessment is wise. This could indicate bigger issues, like structural movement.
When nail pops appear alongside other problems, like cracks or moisture damage, don’t hesitate to seek expert help. They can diagnose deeper issues that might affect your home’s integrity.
Lack the tools or confidence for repairs? A skilled contractor ensures high-quality work with minimal hassle. Professional insight is invaluable for peace of mind and lasting solutions.
Conclusion
Understanding nail pops in walls aids in effective repair and prevention strategies. Quick action can save you future hassle and maintain home aesthetics.
Although often a minor issue, addressing nail pops promptly helps preserve your home’s value. Remain vigilant and seek help when necessary for lasting solutions.
Views Expressed Disclaimer
The views, opinions, and information presented in this article are for informational purposes only and do not necessarily reflect the official policies or positions of Chagrin Falls Painting. While every effort has been made to ensure accuracy, Chagrin Falls Painting is not liable for any errors, omissions, or decisions made based on the content provided. Readers are encouraged to consult professionals for specific advice or assistance related to their unique circumstances.


